
Hi, I’m Peter Wu, a Principal Software Engineer in the PowerPoint team, and I want to share some news about investments we are making to enable you to make your presentations more accessible and reach more people.
Most people with low or no vision use a screen reader to use and work with their computers and mobile devices. Since they cannot see the slides in the presentation, they rely on the screen reader to “speak” the slide contents. As a presenter, you can make a few tweaks to your presentation that will ensure that your content works well with a screen reader.
Setting a reading order
You should make sure that the objects on the slide are read in a logical order. Otherwise, the audience members using a screen reader may not understand your message, or worse they may be getting an entirely different message than the one you intended.
Suppose you have arranged several objects on the slide in a way that is easy for people that can see the slide to read and understand. The order that people read the objects in is usually based on their positions on the slide. People tend to read the objects in the same order that they read text in their language. For example, English text usually flows from left-to-right and then from top-to-bottom, so people expect objects on the slide to follow that order.
But, when using a screen reader, the objects may be read in an entirely different order and there is no way to tell what order the objects will be read in just by looking at the slide.
Introducing the Reading Order pane! It lets you, the author of the presentation, know what order the objects will be read in and enables you to make any adjustments you deem necessary.
To open the Reading Order pane:
- Click Review > Check Accessibility.
- In the Accessibility Checker, click the arrow to the left of the Check reading order category under Warnings, and then click an item.
- Click the down arrow to the right of the selected item and click Verify object order. The objects are listed in the order that the screen reader will read. To make any adjustments, drag-and-drop or use Ctrl+Up Arrow and Ctrl+Down Arrow.
In addition to customizing the slide ordering, you can use the Reading Order pane to group objects into logical units, add alt text to objects, review automatically generated alt text, and remove objects from the reading order. See Make slides easier to read by using the Reading Order pane to learn more.
Adding Slide Titles
You’ll also need to make sure every slide has a unique and meaningful title. When navigating through the slides in the presentation, the screen reader announces the number and title of each slide. If the slides have no titles or identical titles, it is hard for the screen reader user to tell where they are.
If your slide already has a Title placeholder, all you need to do is add one by clicking the arrow to the left of the Missing slide title category under Errors, select an item, click the arrow to the right, and then click Edit Slide Title.
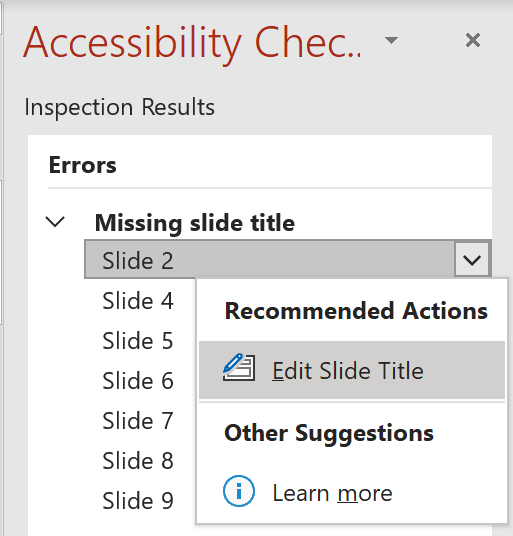
But what if your slide does not have a Title placeholder? Click the arrow to the left of the Missing slide title category under Errors, select an item, click the arrow to the right, and then click Add Slide Title. You’re taken to the “offending” slide where you can add a descriptive title.
Even if you don’t want to have a title visible on the slide, you should still add one to make the slide accessible. To do so, click Add Hidden Slide Title in the drop-down list displayed when clicking the arrow to the right of the selected slide flagged as missing a title. You can see the title while you are editing the slide in PowerPoint and screen readers read the title, but your audience cannot see the title when you present.
Accessibility Checker may also flag a slide as missing a title, even though it appears to have one when you look at it. The cause is usually that a regular text box was used rather than a Title placeholder. If you switch to Outline View, you can see the title in bold next to each slide icon. If there is no text next to the slide icon, there is no title. But, you can easily turn the text box into the title by selecting it and then clicking Set as Slide Title in the drop-down list displayed when clicking the arrow to the right of the selected slide flagged as missing a title. To confirm that the title has been set, just check the slide icon in the Outline Pane and make sure that it appears in bold.
For more information about how you can use these commands and other techniques to add slide titles, see Title a slide.
Empowerment and inclusion
By taking these simple steps, you will make your presentations more accessible to everyone. People who rely on a screen reader will be able understand your message and contribute to the discussion.
Availability
The Reading Order pane is available in PowerPoint for Windows to users running Insider version 1910 or later.
The commands for adding Slide Titles are available in PowerPoint for Windows to users running version 1907 or later.
We typically release features over some time to ensure that things are working smoothly. This is true for Insiders as well. We highlight features that you may not have because they’re slowly releasing to larger numbers of Insiders. Sometimes we remove elements to further improve them based on your feedback. Though this is rare, we also reserve the option to pull a feature entirely out of the product, even if you, as Insiders, have had the opportunity to try them.
Feedback
If you have any feedback or suggestions, you can submit them using the Help Improve Office (🙂) button in the top right corner, or use the Help > Feedback menu.
Learn what other information you should include in your feedback to ensure it’s actionable and reaches the right people. We’re excited to hear from you!
Sign up for the Office Insider newsletter and get the latest information about Insider features in your inbox once a month!